Introduction to AWS DataSync
In today’s digital landscape, managing large-scale data transfers between on-premises storage and the cloud is crucial for many businesses. AWS DataSync is a managed data transfer service designed to help organizations move large datasets to AWS quickly, securely, and efficiently. Whether you need to migrate data, back it up, or transfer it for processing, AWS DataSync simplifies the process with automation and robust features.
In this blog post, we’ll dive deep into AWS DataSync, its requirements, installation steps, features, pricing, and recommendations, helping you understand everything you need to know to get started.
What is AWS DataSync?
AWS DataSync is a fully managed data transfer service that automates the movement of data between on-premises storage systems, AWS storage services (such as Amazon S3, Amazon EFS, and Amazon FSx), or between different AWS regions. It accelerates the process, helping users move data at speeds up to 10 times faster than open-source tools, thanks to optimized data transfer technology and integration with AWS infrastructure.
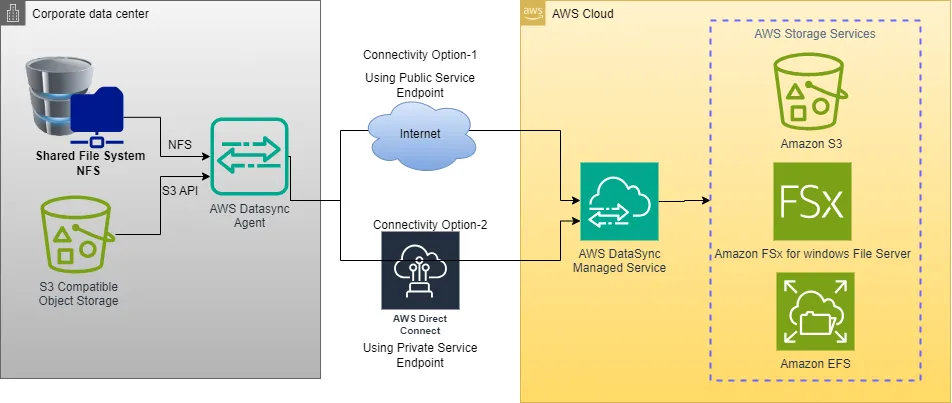
AWS DataSync is ideal for:
- Migrating large datasets to AWS.
- Replicating data between AWS storage locations/regions.
- Continuously syncing data between on-premises systems and the cloud.(Data migration to AWS in an Online fashion via scheduled/discrete data transfer tasks)
Key Features and Benefits of AWS DataSync
AWS DataSync offers several key features and benefits:
- Fully Managed Service: AWS DataSync takes care of the complexity of managing data transfers, including handling retries and dealing with network disruptions.
- Scalability: It can transfer hundreds of terabytes and millions of files quickly, ensuring efficient, scalable data transfers.
- Automation: Automates data transfer tasks, reducing manual effort and errors. It simplifies cloud data migration.
- Security: Data is encrypted in transit using TLS, and DataSync integrates seamlessly with AWS Identity and Access Management (IAM) for access control.
- Built-in Monitoring: AWS CloudWatch integration helps you monitor the progress and performance of your transfers, making it easy to troubleshoot issues.
Hardware and Software Requirements
Before you get started with AWS DataSync, there are certain hardware and software prerequisites to ensure compatibility and efficient performance.
Hardware Requirements:
- Network Access: You’ll need access to the on-premises storage and an internet connection with sufficient bandwidth. AWS DataSync works with network-attached storage (NAS), server message block (SMB), and NFS-based storage.
- VMware Infrastructure: If you’re installing DataSync in VMware, make sure your VMware environment meets the minimum system requirements (at least 4 vCPUs, 16 GB RAM, and sufficient disk space 80GB).
Software Requirements:
- Operating System: Your on-premises servers or network storage must support NFS, SMB, or object storage.
- Supported Storage: Ensure your storage devices are NFS or SMB compatible (e.g., Windows File Servers, NAS devices, etc.).
Networking and Security Requirements
When deploying AWS DataSync, it’s crucial to ensure your network is configured correctly and securely.
Networking Considerations:
- Public and Private Endpoints: AWS DataSync can be set up with public internet access or through private endpoints using AWS Direct Connect or a VPN for improved security and reliability.
- VPC Configurations: If you’re using AWS Direct Connect, ensure that your VPC is properly configured to route traffic between your on-premises storage and AWS services.
Security Considerations:
- Data Encryption: AWS DataSync encrypts data in transit using Transport Layer Security (TLS). Additionally, you can use AWS Key Management Service (KMS) for encryption at rest.
- IAM Roles: Assign appropriate IAM roles with the least privilege required for managing DataSync tasks. AWS provides predefined roles that are ready to use.
- Firewall Configurations: Ensure that your firewalls are configured to allow traffic from your on-premises data center to AWS services.
How to Install/Setup AWS DataSync in VMware?
If you’re using an on-premises VMware environment, you can install the AWS DataSync agent easily. Here’s a step-by-step guide to get you started:
Download the DataSync Agent:
- First, log in to your AWS Management Console and navigate to the AWS DataSync section. You’ll find an option to download the DataSync agent for VMware.
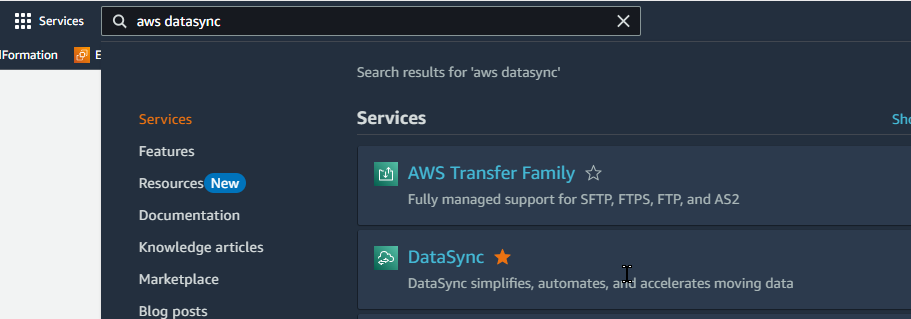
Here you can go to Agents, Click “Create Agent” button

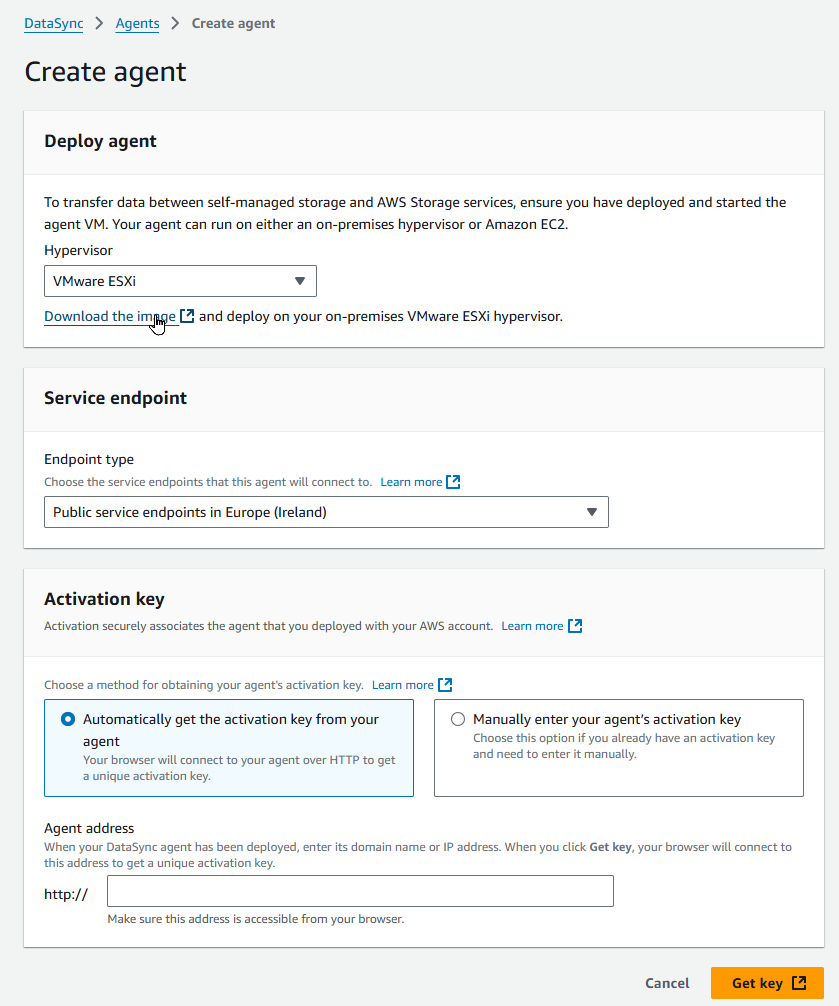
In the “Create Agent” page you have to select a Hypervisor Version, here in this post, i have selected the VMware OVA image
These are available Hypervisor options for AWS Data sync Agent.
- VMware ESXi (version 6.5, 6.7, 7.0, or 8.0)
- Linux Kernel-based Virtual Machine (KVM)
- Microsoft Hyper-V (version 2012 R2, 2016, or 2019)
- Amazon EC2
We have selected VMware ESXi in the dropdown menu and Agent link has appeared on the AWS Console. Click that link and download Agent Image to your local environment.
Deploy the DataSync Agent:
- In your VMware environment, open your vSphere client and deploy the downloaded DataSync agent as a new virtual machine. During the setup, specify at least 4 vCPUs, 16 GB RAM, (32GB ram is required for more than 2Million files) and the required storage space. (in my example here i am using VMware Workstation)
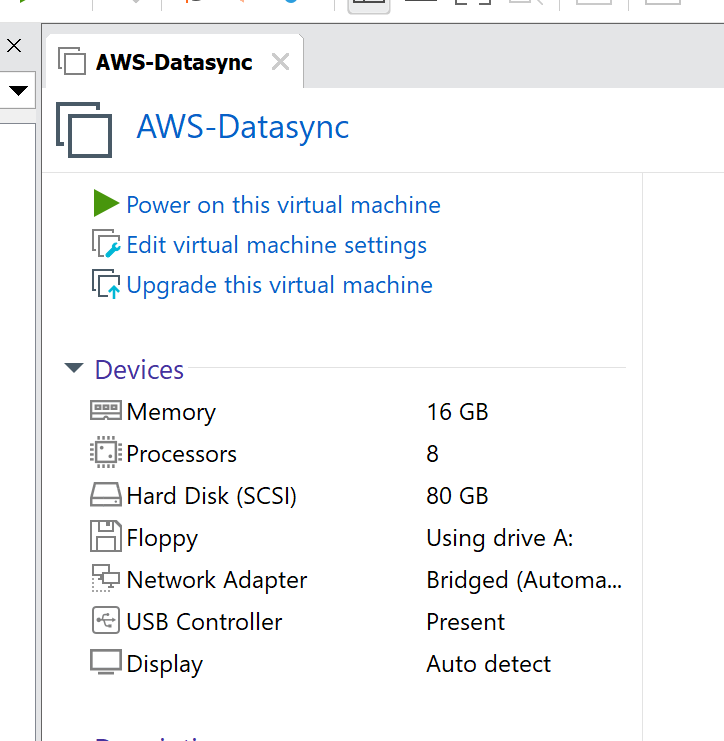
Configure Networking:
- Set up the virtual machine’s network to allow communication with your on-premises storage and AWS services. Make sure that firewalls and security groups are configured to allow traffic to and from AWS. You have only 1 Network Interface, from that interface it will get an IP via DHCP or you can assign a static one yourself, the same interface will be used for connecting On-Prem and then going to the AWS DataSync Service Endpoint)
- If you login via VMware console , The default user name is
adminand the password ispassword. After successful login Configuration menu will appear.
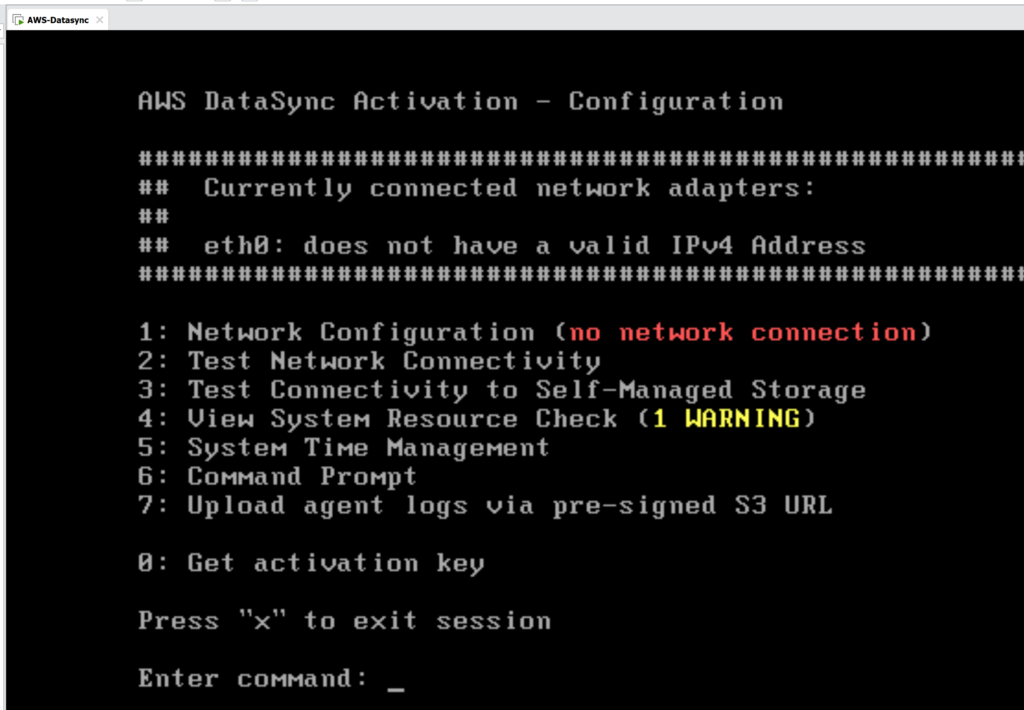
Enter “1” for Network Configuration to access the AWS Data Sync Agent setup. I am choosing the DHCP option, but you can also specify a static IP, default gateway, and DNS information. The DNS must be capable of resolving AWS domains.
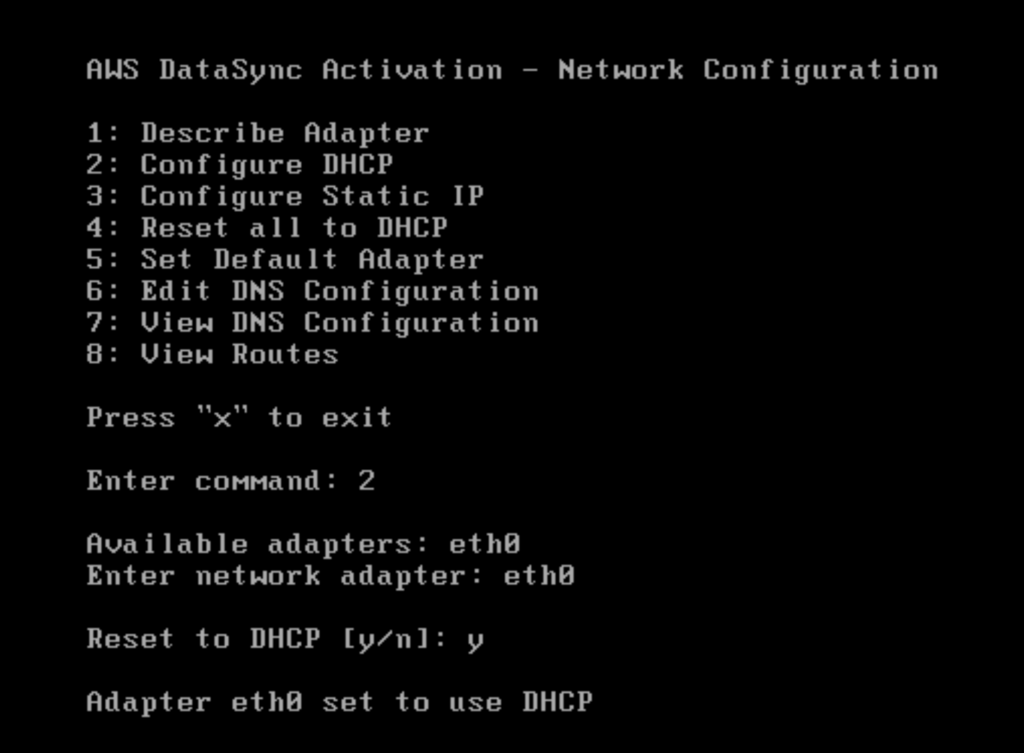
Activate the Agent:
- After deployment, you’ll get a URL for activating the DataSync agent. Enter this URL in the AWS Management Console, and AWS will begin managing the agent for you.
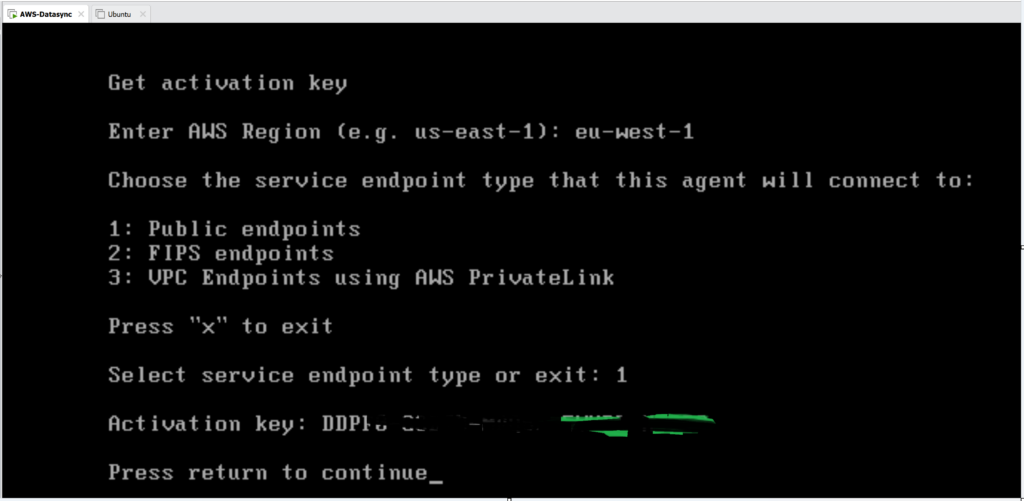
During the agent activation process, I selected Public Endpoints. The main menu also includes an Endpoint Health Check feature, which can be executed before activating the agent. After entering the activation key in the AWS DataSync Console, the agent status was updated to Online. Here in the next screenshot, you can see the agent status on the AWS DataSync Console.

How to Configure AWS DataSync and Create a Simple Task
Once your agent is installed, you can create a simple task to transfer data between on-premises storage and AWS.
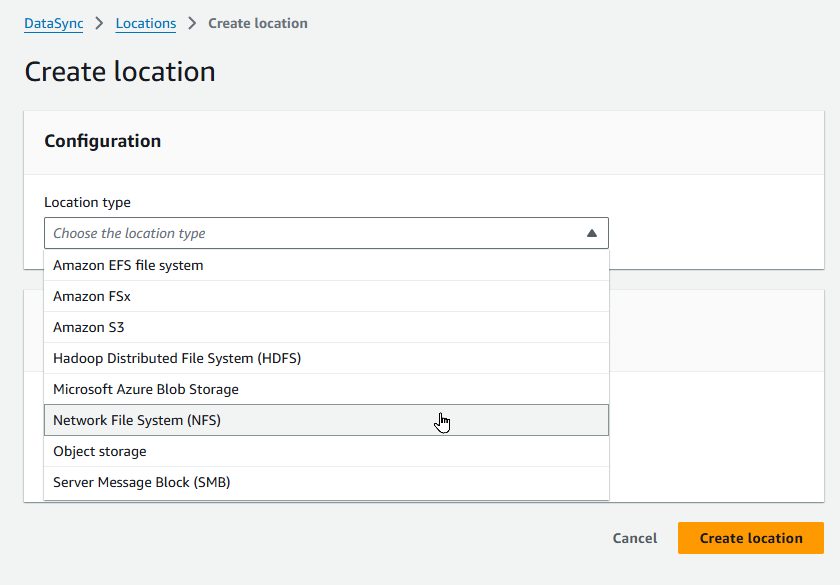
Step 1: Define a Source Location:
- In the AWS DataSync console, define a source location. This could be your on-premises NAS or an NFS/SMB share. Provide the IP address and necessary credentials to access the data.
Step 2: Define a Destination Location:
- Next, choose your destination. This could be an S3 bucket, an EFS file system, or FSx for Windows File Server. DataSync will handle all necessary conversions between storage types. Here in this scenario, i am selecting Amazon S3 bucket, and as a storage class choosing One-Zone-IA
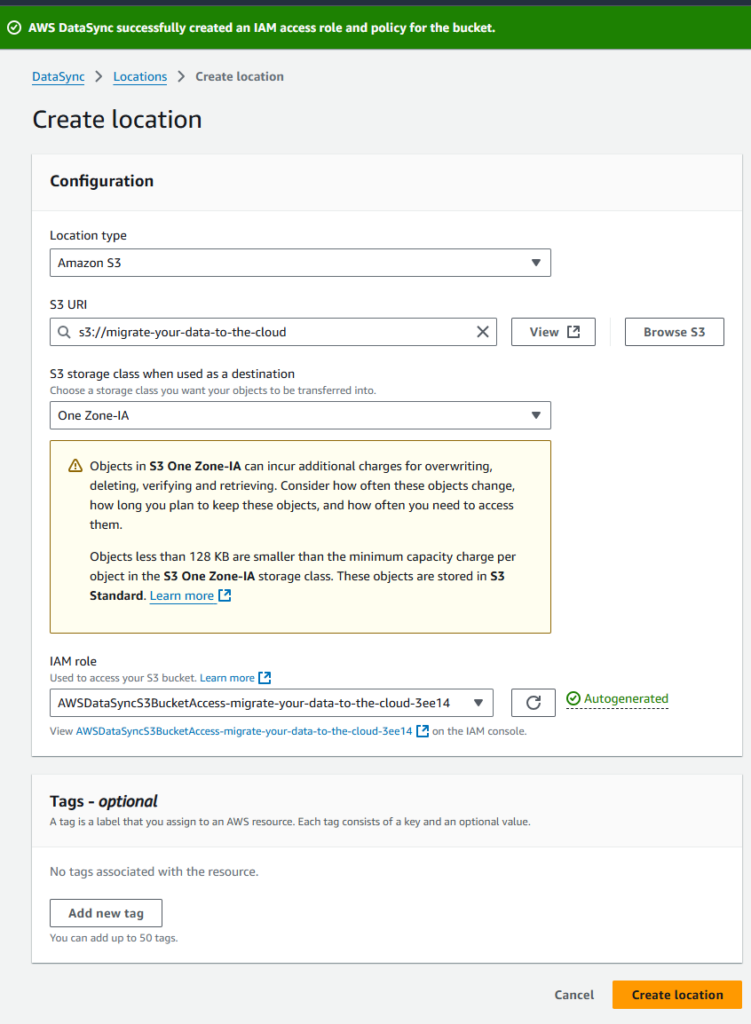
Now we have created one source location and one target location

Step 3: Configure the Task:
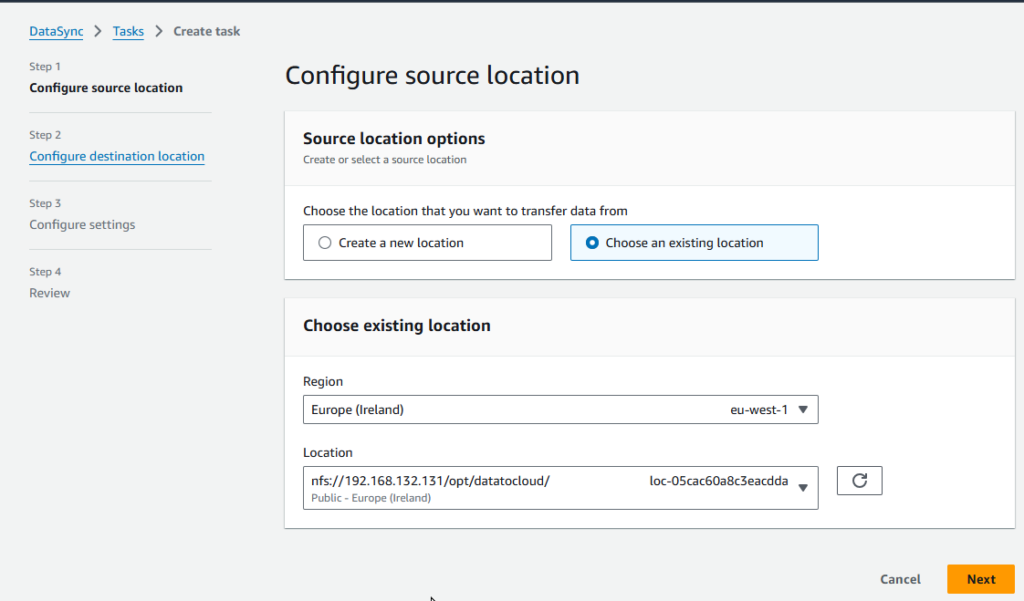
- Define the task by specifying the source and destination locations. You can also configure additional options, such as file filters, to include or exclude specific files. Here i am selecting previously generated source location.
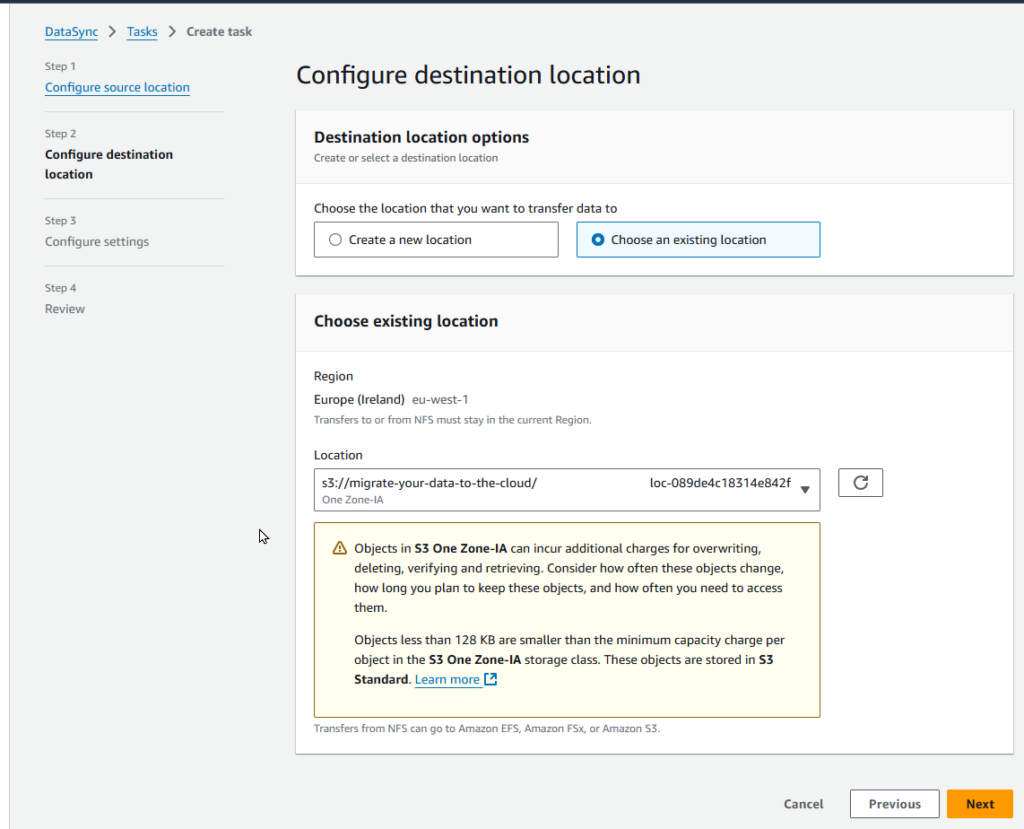
then we have to select a destination location
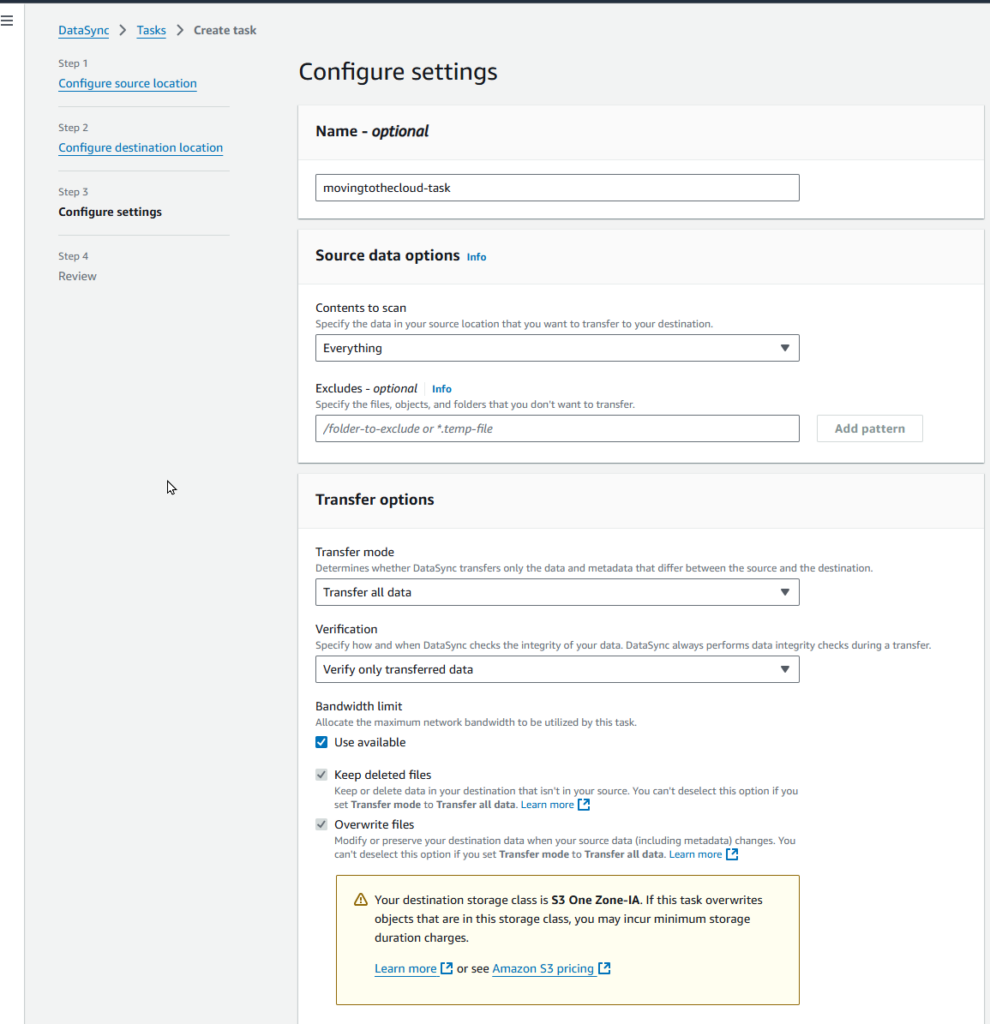
During Task creation, we have to select some options in the settings area, like
Contents to move: we can get scan all the data, and exclude certain folders to not watch,
Transfer Options: we can transfer all the data , or only the data which is changed
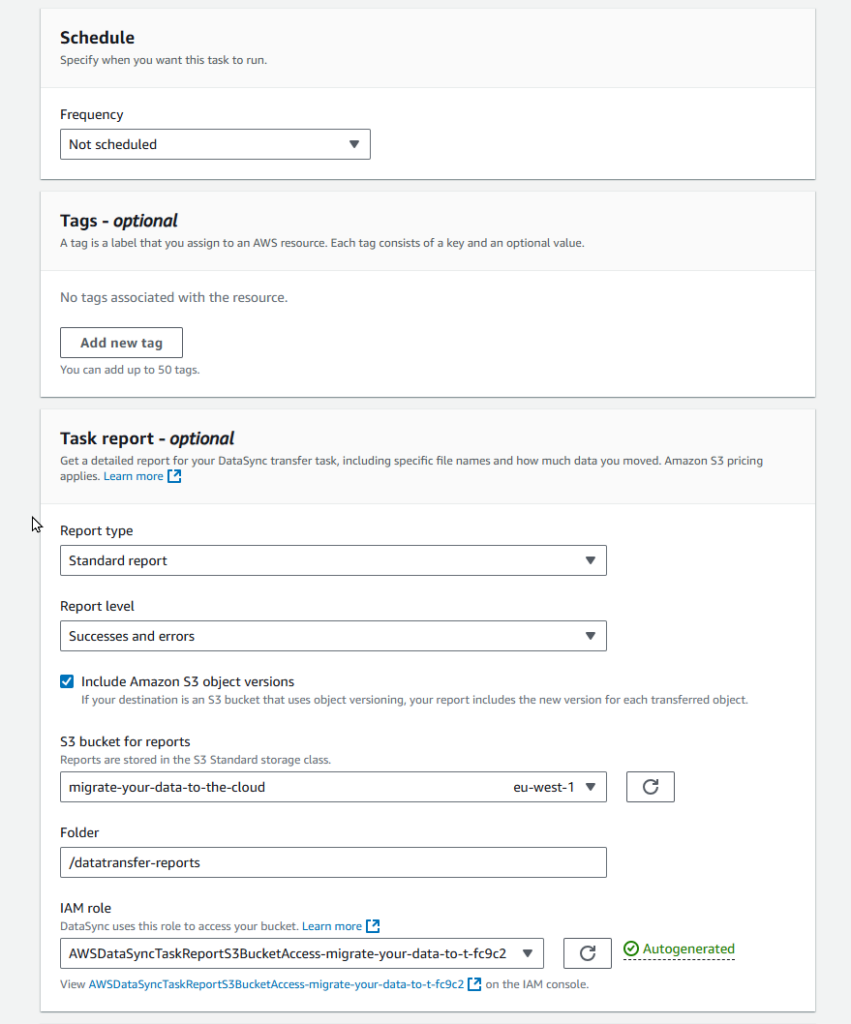
Tasks can be triggered based on Schedule, Daily, Hourly, Weekly, or Cron style but don’t forget
“You can’t schedule a task to run at an interval faster than 1 hour.”
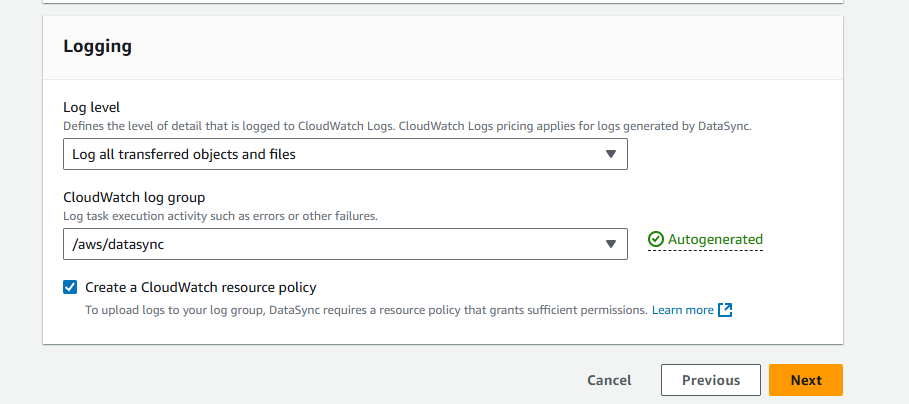
I suggest enable logging for all transferred objects and files to the AWS Cloudwatch service, if you don’t need it, you can keep the log retention time shorter, but later on you can set the Cloudwatch filter to create alarms based on some important events.
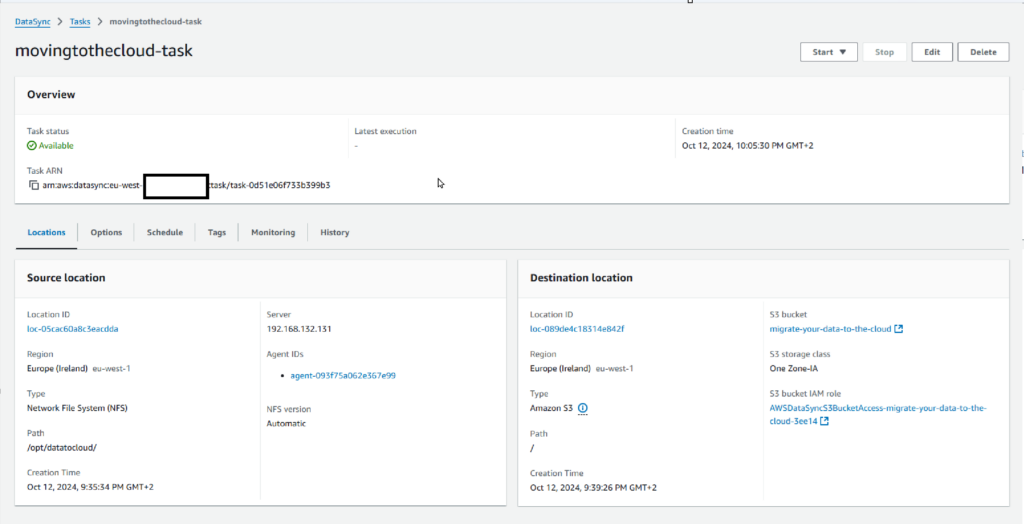
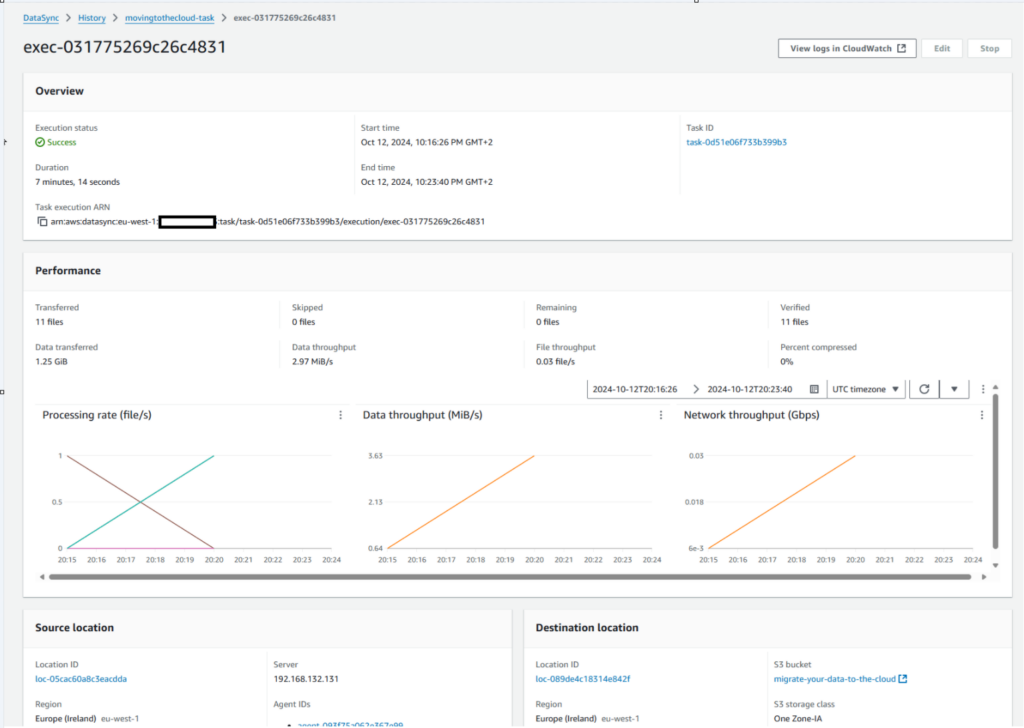
When you click Next, the last configurations are displayed. Then, click “Create” to initiate the data transfer task. In a one-pane glass view, task information is visible on the AWS DataSync Console as shown.
Step 4: Start the Task:
- Once your task is configured, you can start it manually or schedule it to run at regular intervals. DataSync will begin transferring data and provide real-time monitoring and performance metrics.
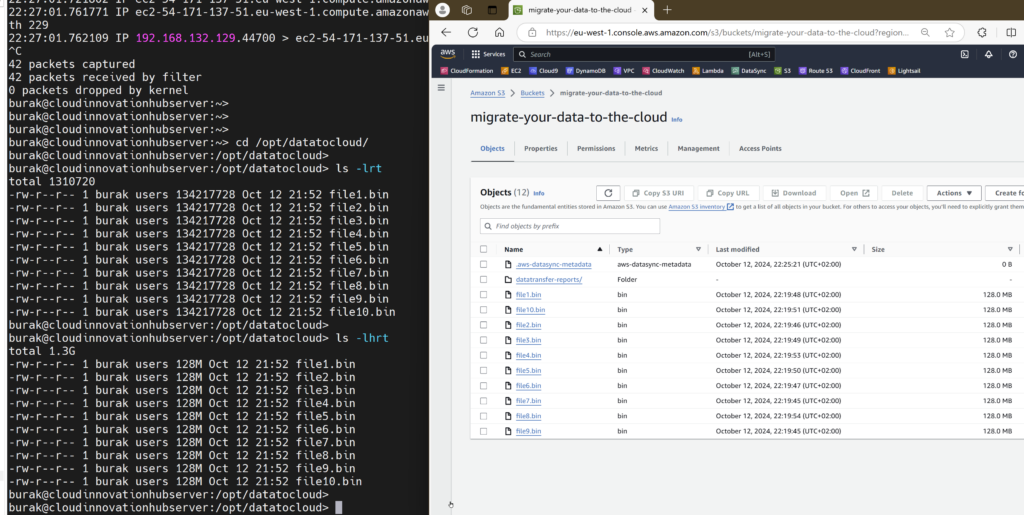
Here in the below screenshot you can see my local files hosted in On-Prem NFS server, and transferred files on S3 on the right hand side.
Use Cases of AWS DataSync
AWS DataSync can be used in various scenarios:
- Data Migration: Move large datasets from on-premises storage to AWS for long-term storage or cloud-based processing.
- Backup & Archiving: Regularly sync on-premises data to Amazon S3 or Amazon Glacier for backup and disaster recovery purposes.
- Cross-Region Data Replication: Keep data replicated between different AWS regions for high availability or compliance with data residency laws.
- Data Lakes: Use DataSync to transfer data from on-premises sources to a data lake on AWS, such as an S3-based data lake.
AWS DataSync Pricing
AWS DataSync pricing is straightforward and based on the amount of data you transfer. You’re charged per gigabyte (GB) of data copied, with no upfront costs or minimum fees. As of the latest updates, DataSync costs $0.0125 per GB transferred, but pricing can vary slightly based on your region. Here i can give you simple calculations on different sizes and connectivity options.
| Data Transfer Size | Via | Total Transfer Cost (Region Ireland eu-west-1) |
|---|---|---|
| 100GB | Internet (Using Public Endpoint) | 1.25 USD |
| 1TB | Internet (Using Public Endpoint) | 12.80 USD |
| 100TB | Internet (Using Public Endpoint) | 1,280.00 USD |
| 100GB | Direct Connect 300MB Single Line (Using Private Endpoint) | 1.25 USD DataSync + 38.50 USD TGW + 87.60 USD Direct Connect Line price + 14 USD VPC Endpoints = 140.25 USD |
| 1TB | Direct Connect 300MB Single Line (Using Private Endpoint) | 12.80 DataSync + 56.98 USD TGW + 87.60 USD Direct Connect Line price + 26 USD VPC Endpoints= 183.38 USD |
| 100TB | Direct Connect 1G Single Line (Using Private Endpoint) | 1,280 USD DataSync + 2,084 USD TGW + 240 USD Direct Connect Line price + 1,040 USD VPC Endpoints = 4,644 USD |
- Data Egress Charges: If you transfer data out of AWS (to an on-premises location or between regions), there may be additional data egress charges.
- Transfer Frequency: Frequent transfers or large datasets can increase overall costs. It’s a good idea to monitor the amount of data you move to avoid unnecessary expenses.
- Networking Charges: Setting up networking with VPC, Transit Gateway (TGW), Direct Connect Gateway, VPC Endpoints incurs separate costs, including data processing fees.
Additional pricing factors to consider:
For up-to-date pricing information, always check the official AWS DataSync pricing page.
Monitoring and Troubleshooting AWS DataSync Tasks
AWS DataSync integrates with Amazon CloudWatch, allowing you to monitor data transfer tasks in real time. You can set up alarms and notifications for failed transfers or performance issues.
Monitoring:
- Use CloudWatch to track key metrics like throughput, data volume transferred, task duration, and success rates.

Troubleshooting:
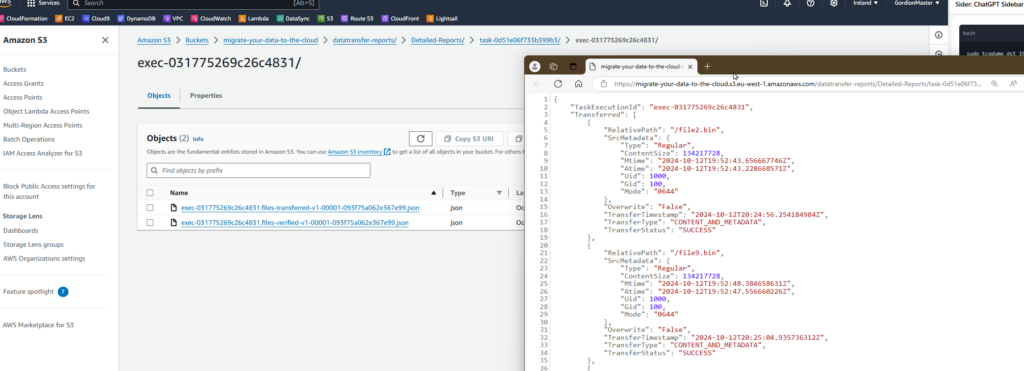
- Check logs for any errors during data transfer, such as network interruptions or permission issues. AWS offers detailed error messages for troubleshooting. We configured the S3 location under the Detailed Reports section, where individual file-level statistics are provided. A processing layer can be initiated upon capturing an S3 data event triggered by the generation of this report file on S3.
Logging:
All data transfer logs are sent to AWS CloudWatch by default. In the task configuration, I’ve selected all logs (both successes and errors), resulting in a very verbose style.

AWS DataSync Comparison with Alternatives
AWS DataSync is not the only solution for moving data to AWS. Here’s how it compares to other options:
AWS Snowball: Best for large offline data transfers, such as petabyte-scale migrations, while DataSync focuses on online, real-time or scheduled transfers, making it more suitable for continuous or periodic data movement.
AWS Transfer Family: This service specializes in managed SFTP, FTPS, and FTP transfers, making it ideal for use cases involving these protocols. In contrast, DataSync supports a wider range of protocols, including NFS, SMB, and object storage, and is designed for high-speed, automated data transfers.
AWS Storage Gateway: Storage Gateway enables hybrid cloud storage, providing on-premises applications with access to virtually unlimited cloud storage. It’s well-suited for extending on-premises environments to AWS for backup, disaster recovery, and hybrid workloads. DataSync, on the other hand, is more focused on transferring data between on-premises storage and AWS quickly and efficiently for migration or synchronization purposes. Storage Gateway acts more as a bridge for ongoing access to cloud storage, while DataSync excels in high-performance bulk data transfer.
AWS CLI: The AWS CLI can be used for file uploads to S3 and other AWS services, but it is more manual and requires scripting for automation. DataSync is a fully managed service designed to automate and simplify large-scale data migrations with optimizations like built-in error handling, compression, and network throttling, features that would need to be custom-implemented in CLI workflows.
Each of these solutions has its strengths depending on the use case. For hybrid environments, Storage Gateway may be ideal, while DataSync excels in high-speed data migrations. Similarly, AWS CLI provides flexibility but requires more manual intervention compared to DataSync’s managed service, which streamlines bulk data transfers with minimal setup. Depending on your data migration requirements, a combination of these services may provide the best results.
Best Practices for AWS DataSync
- Optimize Bandwidth: Use bandwidth throttling to ensure DataSync doesn’t consume all available bandwidth during business hours.
- Schedule Off-Peak Transfers: Whenever possible, schedule data transfers during off-peak hours to avoid congestion on your network.
- Test Before Full Migration: Start with small test transfers to ensure that everything is working as expected before committing to large-scale migrations.
- Dont Migrate All: You can exclude unnecessary folders and filter only relevant files (based on name pattern or timestamp etc) in the task settings
- Compare Other Alternatives: Depending on the data migration timeline and project budget, please evaluate all the options when transferring data to AWS.
How AWS DataSync Handles Data Integrity and Security
Data integrity and security are top concerns for anyone moving data to the cloud. AWS DataSync ensures:
- Checksum Validation: Data integrity is verified using checksums both at the source and destination.
- Encryption: All data is encrypted in transit using TLS, and you can configure encryption at rest using AWS KMS for supported services like Amazon S3.
For more details, refer to the official AWS DataSync security documentation.
Recommendations
AWS DataSync is an excellent tool for automating and accelerating data transfers to the cloud. Whether you’re migrating large datasets, syncing data for backups, or replicating data across regions, its robust features, automation, and scalability make it a highly recommended service. By following best practices and monitoring your usage, you can ensure smooth, secure, and cost-effective data transfers.
Conclusion
AWS DataSync simplifies and secures large-scale data transfers, saving organizations time and effort. Whether you’re moving a few terabytes or hundreds of them, DataSync is built to handle your needs efficiently. If you want a managed, scalable, and secure solution for your data transfer needs, AWS DataSync is an excellent option.
For more information, visit the official AWS DataSync product page to explore the full range of features and services.

